Text balloon
![]()
This command allows you to display text information in a balloon that points to a specific area of the drawing.
Access
- Click the
 icon in the Annotations tab.
Or
- Type "Balloon" in the Quick Search field and then press Enter.
Procedure
- Select the appropriate Filters options.
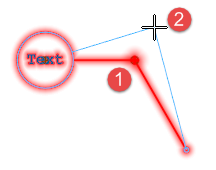
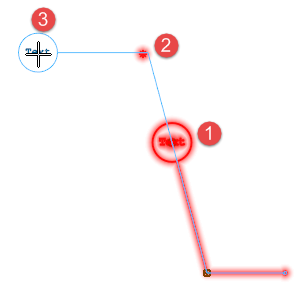
- Click on the reference element to position the arrow of the text balloon.
- Select the type of balloon in the Filters section of the Options tab:
- Circle: Full circle with one text string.
- Two text: Circle divided into 2 sections (a main and a second text string).
- Three text: Circle divided into 3 sections (a main, second and third text string).
- Box: Rectangle with one text string.
- Click on a point to draw the leader.
- If necessary, click on other points to draw the leader with multiple segments.
- Press the [T] key or click the Properties
 icon. This allows you to enter and configure text after validation.
 - The Dimension properties dialog box is displayed.
- Enter your text and define parameters (See Dimension Properties).
- Click OK to validate and close the dialog box.
- Right click to validate.

|
|
Dimension Properties
General Values Tab
The content of this tab changes according to the type of text balloon:
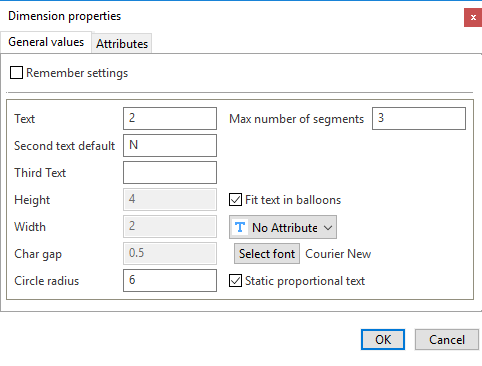
Circle
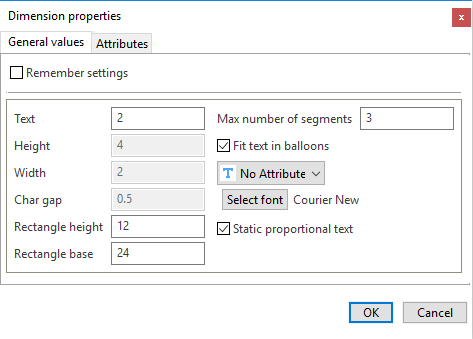
Box
|
Remember settings |
Activate this option to save your current settings. |
|
Text |
Enter the text string in this field. You can use keyboard shortcuts to add special characters:
|
|
Second text default |
Enter the second text string in this field. This field is available if you have selected the Two text or Three text option. You can use keyboard shortcuts to add special characters:
|
|
Third text |
Enter the third text string in this field. This field is available if you have selected the Three text option. You can use keyboard shortcuts to add special characters:
|
|
Height |
Enter the height of characters in this field. It is disabled if the Fit text in balloons option is activated. |
|
Width |
Enter the width of characters in this field (only for static text). It is disabled if the Static proportional text or Fit text in balloons option is activated. |
|
Char gap |
Enter the distance between each character in this field. It is disabled if the Static proportional text option is activated. |
|
Rectangle height |
Enter the height of the rectangular text balloon in this field. This option is available if you have selected the Box option. |
|
Rectangle base |
Enter the length of the rectangular text balloon in this field. This option is available if you have selected the Box option. |
|
Circle radius |
Enter the radius of the balloon in this field. |
|
Max number of segments |
Enter the maximum number of segments, between 1 and 3, for the leader in this field. |
|
Fit text in balloons |
Activate this option to adjust the text size to the balloon. |
|
Text attribute |
Select the text attribute in this drop-down list: Underline, Overline, etc. |
|
Select font |
Click this button to define the font parameters. |
|
Static proportional text |
When this option is activated, proportional text is applied; the width of characters is calculated as a ratio relative to the height of characters. |
Attributes Tab
|
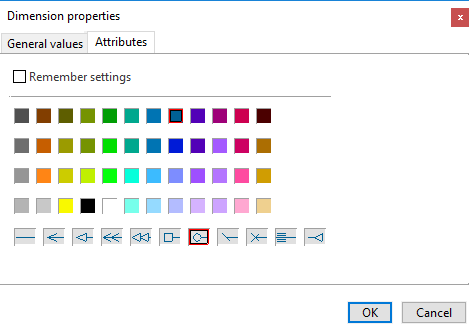
Remember settings |
Activate this option to save your current settings. |
|
Colours |
Select the text colour. |
|
Arrow style |
Select the arrow style for the leader. |
Editing Existing Text Balloons
When activated, this command also allows you to modify existing text balloons.
Editing the Leader
- Run the Text balloon command.
- Select the corresponding text balloon.
- Click on a characteristic point to modify its position.
- Drag the cursor to the new position and click.
- Right click to validate.
|
|
You can add segments to the text balloon:
![]() Note:
Note:
- You cannot add points to a leader which already has 3 segments (maximum number).
- Run the Text balloon command.
- Select the corresponding text balloon.
- Click on the last point.
- Click on other points to draw the leader with multiple segments.
- Right click to validate.
|
|
Editing Text
- Run the Text balloon command.
- Select the corresponding text balloon.
- Press the [T] key or click the Properties icon.
- Enter your text and define parameters (See Dimension Properties).
- Click OK to validate and close the dialog box.