Distance element-element
The Options - Distance element-element dialog box is displayed when you have selected two elements (curve, segment, arc, circle):
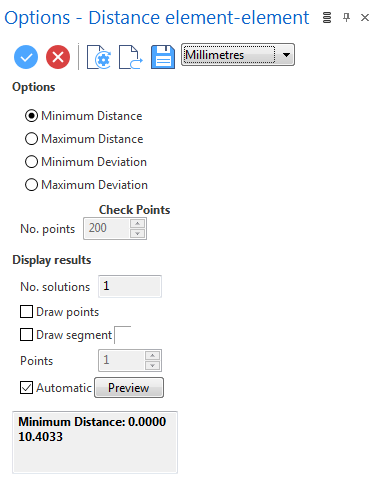
Procedure
- Select the reference unit in the drop-down list at the top of the dialog box, if necessary.
- Select the type of distance in the Options section: Minimum Distance, Maximum Distance, Minimum Deviation or Maximum Deviation.
- Activate the Draw points option if you want to create points at each extremity of the measured distance.
- Activate the Draw segment option if you want to create the segment which corresponds to the measured distance. In this case, you can modify the colour using the corresponding coloured icon.
-
Validate, either by a Right Mouse click or by clicking the
 icon in the graphic area or in the function dialog box.
The corresponding distance information is displayed in the field at the bottom of the dialog box.
If you have selected the Maximum Distance, Minimum Deviation or Maximum Deviation option, the Check Points field is available. This field allows you to increase/decrease the number of points on the first element to be projected onto the second element. The higher the value, the more precise are the calculations.
Preview
Preview generation is Automatic if this option is active. Otherwise, click on the Preview button to obtain a preview in the graphic area.
Top Toolbar
![]()
![]()
![]()
![]()
![]()
![]()
![]()
![]()
![]()
From left to right, this toolbar displayed at the top of the option dialog box allows you to Apply the current values, to Cancel the current function, to Restore the system defaults and to Restore the defaults that have previously been saved using the Save icon.
![]() Note:
Note:
You can take measurements using the various options in the Measurement menu on the Options tab.