Save As
![]()
The Save As ![]() command is used to save a new work file or a copy of an existing work file.
command is used to save a new work file or a copy of an existing work file.
![]() Note:
Note:
Use the Save ![]() command to overwrite an existing file and maintain the name, location and format previously set.
command to overwrite an existing file and maintain the name, location and format previously set.
Access
- Click the Save As icon
 in the Quick Access toolbar at the top of the interface.
 - Select the File > Save As option.
- Type "Save As" in the Quick Search field and then press Enter.
Procedure
To save a new file:
- Click Save As to display the Filename dialog:
- Navigate File Explorer to select the folder location.

- In the Save as type field, select the required file format using the drop-down menu.

- In the File name field, enter the work file name.

- Click Save to close the dialog.

![]() Note:
Note:
The defined settings are used as the default for subsequent Save operations.
After clicking the Save button, the system displays a further dialog summarising the relevant details of the work file, for example, Location path, Number of elements, Last modification date and a box to enter comments. Some of this information is also displayed in the File Information area of the File Menu:
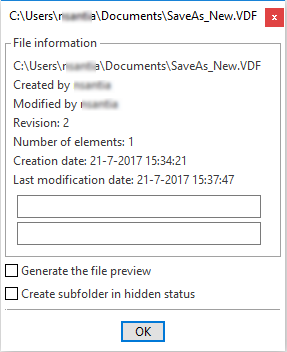
The following options are available:
|
If selected, a support file for the preview is created and saved in the support folder of the work file. If it is not selected a "light preview" file in bmp format is created. For further information, see the Preview section of File Menu. |
|
|
If selected, when a work file is saved, a support folder it is also created stored in the same location and named The folder includes subfolders, for example, Preview and Backup which store, respectively, the preview files and a backup of the work file as specified in the system options setting ( For further information, see File and Folder options). If not selected, the folder will be hidden. |
![]() Note:
Note:
When a work file is saved for the first time using Save, the Save As process will be used.