Delete/Extract Faces
![]()
The Delete/Extract Faces function allows you to delete or extract one or more faces from solids and/or from sheet bodies. The sheet body must have more than one face.
![]() Notes:
Notes:
- This function may be used to clean up a model, to remove features, to create a simplified model which can be used as a stock model after having run an Offset command, etc.
-
When a face is deleted/extracted, a new face can be created to replace the removed one.
Access
- Click the
 icon in the Solids section of the ribbon in the Designer tab of the application.
 - Activate the Modelling tab and then click the icon in the Edit surfaces section of the ribbon.
- This option may also be available in the context menu accessed by a Right Mouse click and in the Quick Access toolbar.
In all cases, this opens the Delete/Extract Faces - Options tab which is displayed along with the ribbon containing the Attributes, Selection, Filters, and Options sections.
Procedure
- Using the Face selection filters, select the face(s) which you want to delete or extract.
- Right Mouse click to confirm and to display the Options - Delete/Extract Faces dialog box.
 See dialog box.
- Select the required options according to the result that you want to achieve.
- Validate, either by a Right Mouse click or by clicking the
 icon in the graphic area or in the function dialog box.
Delete/Extract Faces Options - General Tab
The following options are available in the General tab of the Options - Delete/Extract Faces dialog box. ![]() See dialog box.
See dialog box.
Top Toolbar
![]()
![]()
![]()
![]()
![]()
![]()
![]()
![]()
![]()
From left to right, this toolbar displayed at the top of the option dialog box allows you to Apply the current values, to Cancel the current function, to Restore the system defaults and to Restore the defaults that have previously been saved using the Save icon.
To illustrate the different options, we will use the following model:
Operations
|
Delete |
If this option is active, the selected faces are deleted from the original body. Blue faces selected: the solid is turned into a sheet body.
|
|
Delete and heal |
If this option is active, the selected faces are deleted from the original body. The application attempts to fill the resulting holes by extending the adjacent faces. Blue faces selected: the blends have been removed.
|
|
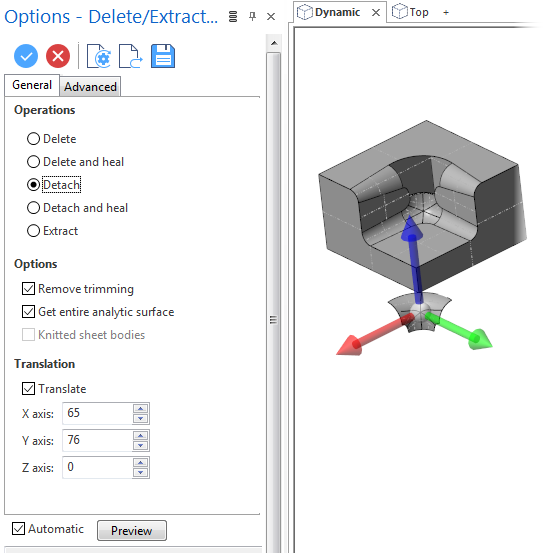
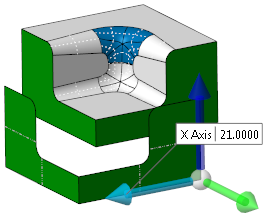
Detach |
If this option is active, the selected faces are detached from the original body. Green faces selected and translated for better visibility: the solid is turned into a sheet body.
|
|
Detach and heal |
If this option is active, the selected faces are detached from the original body. The application attempts to fill the resulting holes by extending the adjacent faces. |
|
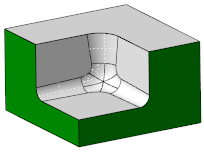
Extract |
If this option is active, the selected faces are extracted from the original body. The original faces are preserved. Green faces selected and translated for better visibility: the original solid remains intact.
|


Options
The following options are not available if one of the Delete operations is selected.
|
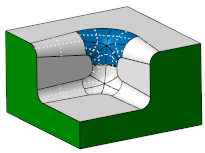
Remove trimming |
Removes the trimming on the detached or extracted faces. Green faces detached and translated for better visibility:
|
|
Get entire analytic surface |
Removes the trimming on the extracted surfaces to obtain the complete original analytic surface. |
|
Knitted sheet bodies |
The extracted surfaces stay united. |

Translation
|
Translate |
This option is active when the Detach or Extract operations are selected. It allows you to translate the faces to another position using the slider in the graphic area or the corresponding dialog box input fields. |
|
X, Y, Z axis |
These fields allow you to enter or adjust the translation values. |
Preview
Preview generation is Automatic if this option is active. Otherwise, click on the Preview button to obtain a preview in the graphic area.
The field at the bottom of the Options panel displays information about missing data, errors or actions.
See also...
Delete/Extract Faces Options - Advanced Tab