Rectangular matrix pointset
![]()
This function allows you to create a rectangular set of points.
Access
- Click the
 icon in the Pointset section of the Wireframe tab.
Or
- Type "Matrix" in the Quick Search field and then press Enter.
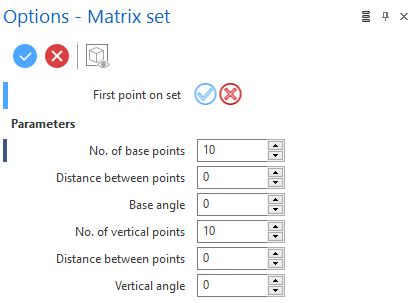
In both cases, the Options - Matrix set dialog box is displayed:
Procedure
- Select the first point of the matrix.
- Enter the No. of base points in the corresponding field.
- Enter the No. of vertical points in the corresponding field.
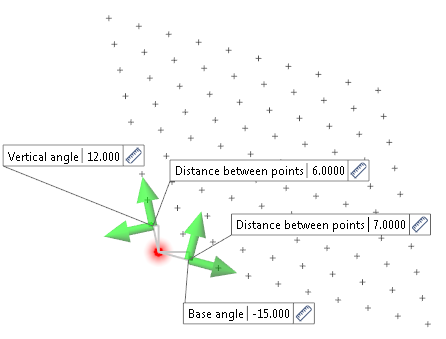
- Define the distance between the base points:
- By dragging the Distance between points arrow in the graphic area.
- By entering the value in the Distance between points field in the graphic area or in the dialog box.
- By clicking on the Measurement
 icon, in the graphic area or in the dialog box (next the active field), and taking measurements.
 - Define the distance between the vertical points:
- By dragging the Distance between points arrow in the graphic area.
- By entering the value in the Distance between points field in the graphic area or in the dialog box.
- By clicking on the Measurement icon, in the graphic area or in the dialog box (next the active field), and taking measurements.
- If necessary, modify the base angle:
- By dragging the Base angle arrow in the graphic area.
- By entering the value in the Base angle field in the graphic area or in the dialog box.
- By clicking on the Measurement icon, in the graphic area or in the dialog box (next the active field), and taking measurements.
- If necessary, modify the vertical angle:
- By dragging the Vertical angle arrow in the graphic area.
- By entering the value in the Vertical angle field in the graphic area or in the dialog box.
- By clicking on the Measurement icon, in the graphic area or in the dialog box (next the active field), and taking measurements.
- Validate, either by a Right Mouse click or by clicking the
 icon in the dialog box.
Top Toolbar
![]()
![]()
![]()
These two icons at the top of the dialog box allow you to Apply the current values or to Cancel the current function.
Preview generation is Automatic if this option is active in the dialog box menu accessed by clicking on the  icon. If this option is not active, click on the
  icon. If preview generation is not possible, the icon is greyed out.
Attributes
- Use the Attributes toolbox to modify the created entities.