Offset circles or arcs
Uniform Offset
- Select the reference circle(s) and/or arc(s).
- Define the offset distance:
- By dragging the Distance arrow in the graphic area.
- By entering the value in the Distance field in the graphic area or in the dialog box.
- By clicking on the Measurement
 icon, in the graphic area or in the dialog box (next to the active Distance field), and taking measurements.
 - Enter the number of copies in the No. copies field.
- Validate, either by a Right Mouse click or by clicking the
 icon in the dialog box.

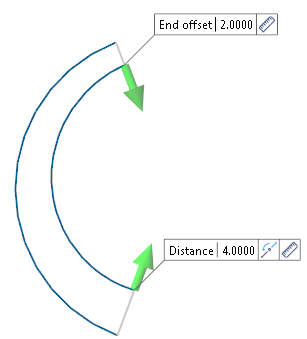
Variable Offset
The variable offset is only possible with arcs.
- Select the reference arc(s).
- Select the Active option in the Variable offset section of the dialog box.
- Define the offset distance:
- By dragging the Distance arrow in the graphic area.
- By entering the value in the Distance field in the graphic area or in the dialog box.
- By clicking on the Measurement icon, in the graphic area or in the dialog box (next to the active Distance field), and taking measurements.
- Define the End offset:
- By dragging the End offset arrow in the graphic area.
- By entering the value in the End offset field in the graphic area or in the dialog box.
- Enter the number of copies in the No. copies field.
- Validate, either by a Right Mouse click or by clicking the icon in the dialog box.
![]() Notes:
Notes:
- The Reference radius field indicates the radius of the selected circle or arc, except for multiple selection.
-
You can use simple JavaScript expressions and mathematical formulas to define the required values.
- Use the Attributes toolbox to modify the created entities.
Side
Selecting the Reverse side option in the dialog box or clicking the ![]() icon in the graphic area allows you to create the offset on the other side of the reference element.
icon in the graphic area allows you to create the offset on the other side of the reference element.
Selecting the Both sides option allows you to create the offset on both sides of the reference element.
Attributes
Selecting the Retain original elements option allows you to keep the reference element after validating the function. It also makes the Retain attributes option available.
Selecting the Retain attributes options allows you to apply the attributes (colour, style) from the reference element to the offset/projected element.
Top Toolbar
![]()
![]()
![]()
These two icons at the top of the dialog box allow you to Apply the current values or to Cancel the current function.
Preview generation is Automatic if this option is active in the dialog box menu accessed by clicking on the  icon. If this option is not active, click on the
 ![]() icon. If preview generation is not possible, the icon is greyed out.
icon. If preview generation is not possible, the icon is greyed out.
Information Field
The field at the bottom of the dialog box displays information about missing data, errors or actions.
For further information...